Behind the Scenes: Collaborating with an Artist to Design My Book Cover
- Abigail Henson
- Aug 6, 2025
- 3 min read

One of the most exciting milestones in a book’s journey to publication is seeing the cover for the first time. It’s the moment when the story, characters, and mood are distilled into a single image that will (hopefully) grab a reader’s attention from across a bookstore or scrolling feed.
Designing a cover isn’t just about finding something pretty — it’s about capturing the heart of the book. For my upcoming novel, I knew I wanted to work closely with an artist to create a custom illustration that felt true to the world I had built. Here’s what I learned from the process of collaborating with a cover artist.
Step 1: Finding the Right Artist
Before anything else, I had to find an artist whose style resonated with my book’s tone. However, I had no idea where to start. I spent weeks browsing portfolios on platforms like ArtStation, Instagram, and Behance. There were so many talented artists, I didn't know who to choose, and I wanted someone I could trust. That was when I remembered that I already knew someone who could design a great cover: Kensuke Okabayashi.
Once I narrowed it down, I reached out with a clear email that included a short pitch of the book (title, genre, a one-line hook) and the vibe I wanted for the cover (moody, whimsical, dark fantasy, etc.)
Step 2: Communicating the Vision

After Kensuke agreed to take on the project, we had a brainstorming session where I shared:
A mood board of visual inspiration (other book covers, art pieces, textures, colors)
Character descriptions, especially for those who might appear on the cover
Key themes and emotions I wanted the cover to evoke
Specific “dos and don’ts” (e.g., “no modern-looking clothes,” “use green as a theme”)
One thing I learned here: be specific, but also trust the artist’s vision. They bring a visual
storytelling skill set to the table that’s different from mine as a writer.
Step 3: The Drafts and Feedback Loop

Kensuke began with a few rough concept sketches. These weren’t polished, but they helped us decide on composition — where the title would go, how characters and landscape would be framed, etc.
Once we picked a direction, Kensuke moved on to a more detailed version. This is where the feedback loop started. I made sure my feedback was:
Focused on big-picture elements first (pose, color palette, mood)
Respectful and collaborative (“I wonder if we could try…?”)
Clear about what was working, not just what wasn’t
Step 4: Finalizing the Design

After a couple of rounds of revisions, we landed on a design that felt exactly right. From there, Kensuke refined all the small details — textures, lighting effects, and refining character and background details.
Tips for Working with an Artist
Be organized. Have your ideas, references, and deadlines ready before reaching out.
Respect their process. Good art takes time — build in buffer weeks for revisions.
Be open to surprises. Some of the best ideas will come from the artist’s interpretation.
Celebrate their work. Credit your artist in your book and marketing materials — they are a creative partner in your story’s journey.
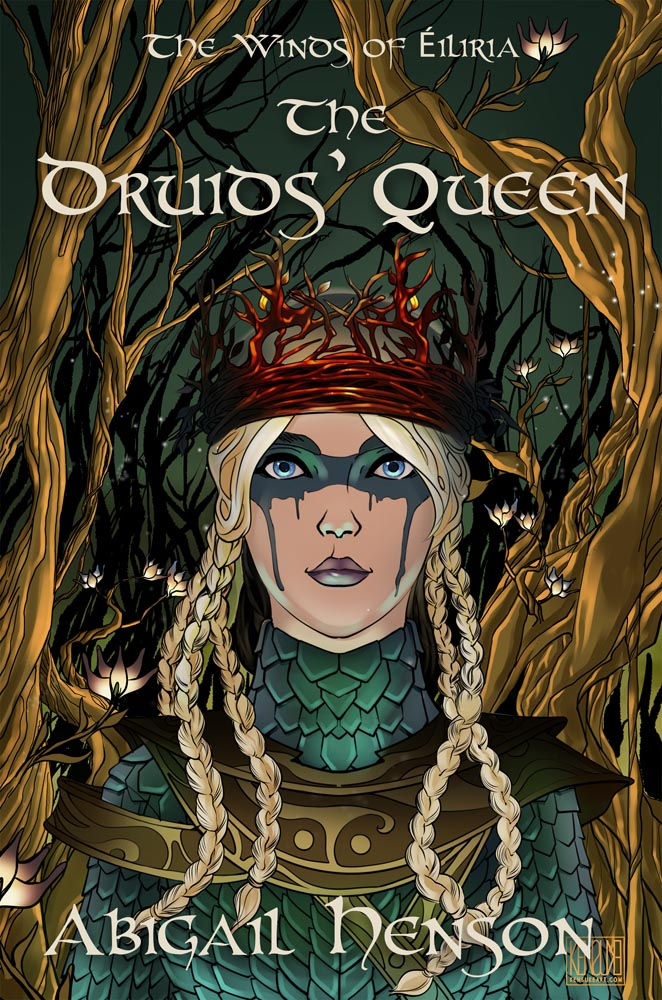
The Result? Pure Magic.

Seeing the finished cover for the first time felt like seeing my story through new eyes. It wasn’t just my vision anymore — it had become a shared creation, something richer and more layered. Collaborating with an artist is a vulnerable process, but it’s also incredibly rewarding. The right cover can make a reader pause, look closer, and think, “I need to know what’s inside this book.”
And that’s exactly what we want, isn’t it?
Check out Kensuke's art at KensukeArt.com and his free art tutorials on his YouTube channel @KensukeART. You can also purchase his book on drawing Manga: Manga for Dummies 2nd Edition.


Comments